Tuesday, November 15, 2022

It's Tide Pool Season in California!


As we get closer to winter, the low tides become especially low, so this is an excellent time for viewing ocean life in tide pools. It's a time of year I always look forward to! 

Tide pooling season begins in the fall and continues through the winter and into early spring. It is at these times when you can catch a negative tide during the daytime. If you want to plan a trip, it is helpful to first consult a tide chart like this one for San Diego:

Tide Chart for San Diego

A ranger at Cabrillo National Monument said that any tide at or below 0.7 feet is good for viewing sea life, and the lower the tide, the better.

A trip to the tide pools is always a favorite among students. It feels great to get out to the ocean, and there are always so many things to explore and discover.


California Sea Hare

California Sea Hare Eggs

Tide pooling is a nice activity to do with your family, too!


If you plan to explore to explore tide pools with a school group and live in the San Diego area, Cabrillo National Monument offers some great ranger-lead programs for K-12 students. Their programs are free, and many are aligned with the Next Generation Science Standards (NGSS). 


With middle school students, I have participated in the Science Sampler and the Climate Kids programs, both for grades 5 - 12. The Science Sampler program engages students in practicing data collection on populations of organisms living in tide pools, modeling the way in which biologists collect this data at Cabrillo National Monument. The Climate Kids program addresses the affects of climate change, specifically ocean acidification, on sea life. 

Another benefit of a ranger-lead experience is having an expert help you spot hard-to-find creatures such as nudibranchs, sea hares, and on rare occasions, an octopus.

Spanish Shawl Nudibranch

If you are interested in learning more about the science programs offered at Cabrillo National Monument, follow this link:

Cabrillo National Monument Science Programs

Whether you explore tide pools independently or with a ranger, here are some things you might like to have with you:

* Closed-toe shoes with good traction (old sneakers)

* Pants that can be rolled up and warm layers on your upper body

* Sun protection (hat, sunscreen)

* Towel(s)

* Change of socks, shoes, and clothing (just in case you slip in the water)

* A Ziplock bag for your cell phone, if you bring one (not advised for students)

When wading in the tide pools, keep your eyes out for big waves, and avoid turning your back to them. Walk between the rocks rather than stepping on them. If you step on rocks to avoid walking in the water, you could easily slip on algae and really get yourself wet!

I hope that you enjoyed this blogpost and found it helpful. If you are interested in joining my email list, please follow this link:


                                SUBSCRIBE TO EMAIL LIST


Friday, November 4, 2022

Chemistry Project: Engineer a Heating Pad for Sea Turtle Eggs


Give your students the challenge of designing a prototype of a chemical heating pad that could be used to transport rescued sea turtle eggs. This chemistry project can be used to teach the Next Generation Science Standard (NGSS) MS-PS1-6: Undertake a design project to construct, test, and modify a device that either releases or absorbs thermal energy by chemical processes. The project also addresses the middle school engineering design standards.

The heating pad project was created by the American Chemical Society, which has multiple free lessons available online that are aligned with the Next Generation Science Standards (see link at the end of this post). 

With the modifications I used, the project took about five or six class periods to complete. Before beginning this project, students had completed labs investigating endothermic and exothermic reactions. 

Photo by David Troeger on Unsplash

To launch the project, I created a slideshow introducing students to factors that put sea turtles at risk. One factor is climate change. Whether sea turtle eggs develop into male or female babies is dependent on the temperature at which they are incubated. As temperatures continue to rise, the sea turtle population becomes increasingly more female. Another factor is illegal poaching. Sea turtle eggs are considered a delicacy, which makes them prized by poachers. To mitigate these threats, if sea turtle eggs could be transported safely, the eggs could be moved to a hatchery until baby turtles are ready to be released into the ocean.

Photo by David Reynolds on Unsplash

The last slides of the slideshow introduce students to the challenge of creating a chemical heating pad with these specifications:

The heating pad should...

  • Provide padding to the egg

  • Stay within the temperature range of 29 ℃  - 31 ℃ 

  • Remain within the temperature range for at least 5-10 minutes

Students are limited to making the heating pad out of these materials:

  • Calcium chloride and/or baking soda

  • Water

  • A resealable sandwich bag

I found that calcium chloride can be purchased relatively cheaply as fragrance free DampRid refill bags.

When students begin the project, they combine specified quantities of water, calcium chloride, and/or baking soda in order to observe changes in temperature. After making these initial observations, students are free to experiment with differing amounts of the substances to find a combination that best meets the specifications they are given. I required students to record the quantities of the substances they used and their observations for each trial and created simple tables to help them do this:


It's interesting to see how different students approach the design process. Some dive in and start experimenting with very different combinations of substances until they discover one that works well, while others are very methodical. I have observed that both strategies seem to work! I remind students to look at their data and use it to make thoughtful choices about the next iteration of their heating pad design.

Once I am able to gauge students' progress and can estimate when they will finish, I set a deadline for completion. On the final day of the project, students must demonstrate to me that their heating pad works. They measure and combine substances in their sandwich bag and show me how it stays within the desired temperature range for at least five minutes. I have done this demonstration in two different ways, either by having the entire class begin at the same time, or by asking lab partners to let me know when they are ready to begin.

After completing the demonstration of their heating pad, students reflect on why the heating pad might perform in an unexpected way for the demonstration. They also describe changes they would need to make for the heating pad to be commercially viable. For students who have problems demonstrating the performance of their heating pad on the final day of the project, I remind them that their grade is based on their recorded data and their ability to follow the engineering design process. They needed to use their data to make changes in the design of their heating pad as they were developing it.

If you would like to explore the American Chemical Society lesson plan on engineering a chemical heating pad, follow this link:


A previous blogpost explores a fun American Chemical Society lesson on polymers in which students create "gel worms":


Polymer Lab: Gel Worms


I hope that you enjoyed this blogpost and found it valuable. If you are interested in joining my email list, please follow this link:


                                SUBSCRIBE TO EMAIL LIST


Tuesday, October 18, 2022

Why Do Leaves Change Color in the Fall?


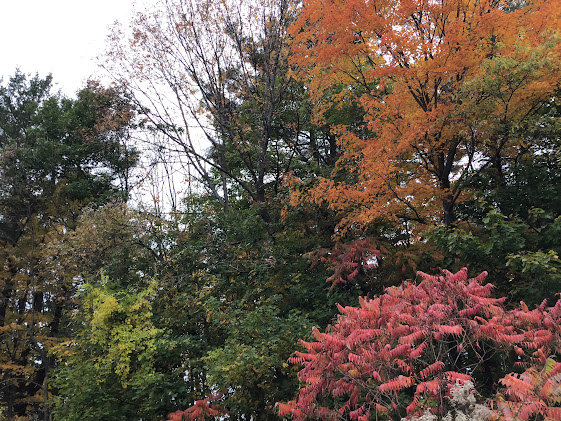
Why do leaves change color in the fall? This is the question I posed to my ten-year-old daughter when we took a short trip to Maine this month. I gave her the assignment of doing some research on the topic and writing a response. When I read what she had written, I thought that she had done very well with her explanation. I told her that we should share it with others, who might enjoy learning from what she had written. She suggested I post it on my blog, so here it is! The following piece and the photo of foliage above were done by her.

The leaves change color in the fall because the leaves start producing less chlorophyll. If you are wondering, chlorophyll is a chemical that makes leaves green. Chlorophyll is responsible for photosynthesis, when plants take in water and carbon dioxide and use sunlight to make sugar to feed themselves. In the fall, there is less sunlight, which means less photosynthesis for the plants and less need for chlorophyll. When this happens, the trees prepare to go dormant in the winter. Without chlorophyll, the green leaves start turning into red, orange, yellow, and brown leaves. As the chlorophyll breaks down, the carotenoids, orange-yellow and brown pigments, and anthocyanin, red and purple pigments, are revealed and/or created. (Most anthocyanin is created in the fall.) That is why sometimes the leaves are not solid colors, but a mix of colors because the carotenoids and the anthocyanin are slowly being revealed and/or created while the chlorophyll breaks down.

I hope that you enjoyed reading my daughter's work and perhaps learned something, too!

If you are interested in other blogposts related to science topics we explored while on vacation, here are a couple of links:

Snow Science: Freezing and Melting Points the Same?!


I hope that you found this blog post valuable. If you are interested in joining my email list, please follow this link:

                                SUBSCRIBE TO EMAIL LIST


Monday, October 10, 2022

Personality Quiz with Plant Cell Parts

                                                                                                                            Updated March 5, 2024

You can use a fun personality quiz to get your students better acquainted with the parts of a plant cell. What plant cell part best matches each of their personalities? Do your students like finding out information and passing it on like mRNA does? Maybe they are full of energy, like the mitochondria, or leaders, like the cell nucleus. When I created this activity for my sixth- and seventh-graders last year, I was pleasantly surprised by how much they enjoyed it!


As I was preparing my lessons for a return to school after a long Spring Break, I wanted to come up with an activity that would ease students back into their studies and provide a review of cell parts. We had already completed the Cell City project on animal cells, and I wanted to reinforce what they had learned about plant cells. A friend shared with me the idea of relating cell parts to different types of people. My daughter had been taking various personality quizzes and suggested I create one for my students related to cell organelles. This turned out to be a great idea!


The plant cell personality quiz I created has a very simple format: a Google slideshow with personality types on each slide, all referring to the last slide, which reveals which plant cell part the student would be. The last slide also includes a description of what the cell part does. Here is an example of one of the personality type slides:


After discovering which cell parts they would be, students report their results on a Google Form. They explain why their personality matches the cell part. Students also need to report the result of one peer and give their opinion of whether the cell part is a good match for their peer’s personality. Grading this assignment was fairly easy because in Google Forms, you can view the quiz results in a spreadsheet, allowing you to view all the students' results at the same time.


Before giving students the personality quiz, I told them that I had some guesses about what their personality quiz results would turn out to be. As they completed the quiz and I asked them about their results, I found that I had guessed correctly on many though some were a surprise! As students shared their results with me and one another, this activity turned out to be a way to not only review plant cell organelles but also to connect with one another.


I have posted this Plant Cell Personality Quiz for free on TPT. Here's the link:


Plant Cell Personality Quiz on TPT


If you are interested in a project related to cell parts, follow this link:


Cell City: Cell Organelles Project


I hope that you found this blog post valuable. If you are interested in joining my email list, please follow this link:


                                SUBSCRIBE TO EMAIL LIST


Friday, September 30, 2022

FIRST LEGO League Robotics


Our FIRST LEGO League team members were so excited when they qualified for the tournament at Legoland! Servo Squad, the Museum School's robotics team, had spent more than a month preparing for the qualifying tournament. They built and programed their robot, created a project to present, and strived to work together as a cohesive team, following the FIRST Core Values. 

The FIRST LEGO League Challenge is for children aged nine to sixteen (there are additional programs for various ages). Students use creative problem solving as they design and build LEGO robots and program them to complete challenges that consist of manipulating objects made of LEGOs placed on a table covered with the Field Mat.


The theme and challenges teams complete change each year. Registered teams receive LEGO pieces for building objects needed for the challenges along with the Field Mat, which fits onto a table supplied by the team. (Our table was built by a team member's parent to meet the specifications.) Once set up, students have a near duplicate of the "playing field" they will use at an event.

At an FLL event, teams receive points for the challenges their robot completes. They are also judged on their robot design. Servo Squad was proud to take home a second-place trophy for robot design at a qualifier, and the points they gained in this area helped them move on to the next level of competition.
A third piece of the FIRST  LEGO League Challenge is the project. Students design a solution to a given problem that is centered around that year's theme. They must build or draw a prototype of their solution, and present it to judges at the tournament.

The fourth component of the competition is my personal favorite: following the FIRST  Core Values. Teams actually receive points for their conduct, and we found that this can truly be a game changer! I am proud to share that Servo Squad performed exceptionally well in the area of Core Values, winning a first-place trophy one year.  

The students' ability to follow the Core Values is tested while preparing for and taking part in FLL events, which can put teams under pressure. At the events, students must stay positive and keep their cool while presenting their robot and their project in front of judges. The most pressure seems to be on the robot operators, who launch their robots onto the playing field with music blaring, cameras on their robots, and announcers describing every outcome. 
Through all of this, the FIRST  Core Values encourage students to exhibit "Gracious Professionalism"  and "Coopertition", and to remember to have fun! 

After getting through some challenges related to team cohesion, Servo Squad learned the importance of teamwork and staying positive. When they got to the Legoland tournament, their robots did not perform as well as they had hoped. Despite this, they kept smiles on their faces and supported one another in enjoying themselves. The judges were so impressed with their upbeat attitude that the team walked away with the Judges' Award at the end of the tournament!


Focusing on the FIRST  Core Values is a key part of the learning experience as teams prepare for and participate in an FLL event.

One of the barriers to taking part in the FIRST  LEGO League Challenge can be the high cost of the robot and registration. Teams often fund raise to help with these costs. Our team decided to offer reasonably-priced after-school robotics classes to students in younger grades. This helped a bit with the cost and gave team members the experience of teaching and mentoring potential future members of the robotics team.

When students participate in the FIRST  LEGO League Challenge, they gain skills in programming, creative problem solving, and working on a team, all the while focusing on positive values that will serve them lifelong.

If you are interested in learning more about FIRST  LEGO League, you can follow this link:


I hope that you found this blog post valuable. If you are interested in joining my email list, please follow this link:


                                SUBSCRIBE TO EMAIL LIST


Tuesday, September 13, 2022

Drooling Pumpkin Chemistry Lab for Halloween


In this Halloween chemistry lab, students create a jack-o-lantern that foams at the mouth! You can use the lab to address NGSS standard MS-PS1-2 as students observe properties of the reactant (hydrogen peroxide) and the bubbly products of the reaction.

I have used the "drooling pumpkin lab" with students in seventh and eighth grade. The class size has usually been about twenty-five students, and there has always been another adult in the room with me. This is helpful for managing materials and spills and to keep an eye on safety because sharp tools are required to carve the pumpkins. Students usually keep their behavior in check because they are excited to do the lab and know that safe behavior is a requirement for participation.

Students work at tables in pairs or small groups. They start by carving their pumpkin into a jack-o-lantern.

Before carving the pumpkins, be sure to put them onto a tray or paper to protect the tables because it gets messy! Suggest to students that positioning the jack-o-lantern's grin lower on the pumpkin will help the reactants flow out of its mouth. (After carving the pumpkins, you will have lots of seeds, so you could ask
parents ahead of time if they would like to take some home to roast in the oven.) Depending on how much time you have with students, carving the pumpkins alone can take a full class period.

The reaction used to create the foam that oozes out of the jack-o-lantern's mouth is the decomposition of hydrogen peroxide, a liquid easily found in solution at pharmacies. Yeast is used as a catalyst in the reaction, so this is a good opportunity to teach students how a catalyst does not take part in the reaction but merely helps it happen. (I found a one-pound bag of yeast online and stored it in the freezer for many years.)

To activate the yeast, student groups mix a few tablespoons of yeast with a few tablespoons of lukewarm water in a small container and let it sit for about 5 minutes, forming a paste. Meanwhile, students pour about 1 cup of hydrogen peroxide solution into another small container and mix in a few drops of dish detergent. (I recommend using an unscented soap for students sensitive to smells.) The dish detergent will capture the bubbles produced by the decomposition of hydrogen peroxide, creating a foam.

Students lower the container of hydrogen peroxide solution with dish detergent into the jack-o-lantern, add the yeast paste, and stir. Soon, the reactants flow out of the pumpkin's mouth, causing it to drool! In some cases, positioning the container of hydrogen peroxide close to the jack-o-lantern's mouth can help students get this effect.


So, where did the bubbles come from? Yeast speeds up the decomposition of hydrogen peroxide into hydrogen and oxygen, and these gases are captured by the soap, creating the foam. Students can easily see that a chemical reaction has occurred!

If you are interested in other fun chemistry labs, you might like this blogpost on making "gel worms":


I hope that you found this blog post valuable. If you are interested in joining my email list, please follow this link:


                                SUBSCRIBE TO EMAIL LIST


Wednesday, August 31, 2022

Classroom Icebreaker / Getting to Know You Activity: Venn Diagrams


Venn diagrams can be used as an icebreaker to help students get acquainted at the beginning of the school year. I have also used Venn diagrams as a team-building activity when beginning a group project. Venn diagrams are a simple, low-prep yet effective way to help your students get to know one another.

The format is very simple. You can use a two-circle Venn diagram for pairs or a three-circle Venn diagram for groups of three. When beginning a group project with teams larger than three students, you can break students into smaller groups and pairs. Whether I plan to have students work with a partner or in a small group, I always prepare a few copies of the alternative form of the Venn diagram in case the number of students present that day is not divisible by two/three.


After I tried having students draw the Venn diagrams themselves, I found that giving them copies of pre-made Venn diagrams works best because it is tricky to draw intersecting circles with spaces large enough to write. I have either drawn the circles myself to photocopy or found Venn diagrams online.


To begin the activity, ask each student to write his/her/their name just outside of one of the circles. Partners and groups of three talk about themselves- their interests, families, backgrounds, likes, and dislikes. In the space where the circles intersect, they write the things they have in common. Students note ways in which they are unique in the area where the circles don’t intersect.


Keep in mind that some students will begin conversing without much prompting, while others will need a little support. It can help to write suggested topics (favorite foods, hobbies, talents, number of siblings, pets, etc.) on the board and circle around to prompt students as they work.


When students finish, you may want to have them share with the class what they have learned about one another. I often ask pairs and groups to share one way in which they are alike, and one thing that made each student unique.


I hope that you found this blog post valuable. If you are interested in joining my email list, please follow this link:


                                SUBSCRIBE TO EMAIL LIST


Tuesday, August 9, 2022

Beginning of the School Year Activity: Decorate Room with Student Collages


At the beginning of the school year, two common priorities for teachers are classroom decor and getting to know their students. One beginning of the school year activity I have used does both of these things. 

The simple activity of having students make collages that express their personalities was shared with me by Ann Davis, who at the time was a parent of one of my students and working towards a Masters in Expressive Arts Therapy. My students and I were fortunate to benefit from her enriching activities, which helped students reflect, build self-esteem, and connect with one another. The collage activity she taught me is one I started using at the beginning of the school year. It invites students to express their individuality, and in doing so, provides an opportunity for members of the classroom community get to know one another better. 

To prepare for making collages, I begin collecting magazines and other paper media with a variety of images. Emailing parents and asking students to bring in magazines is very helpful. I put out a box or other container to collect the magazines as they come in. Be sure to preview donated magazines before making them available to students though- one year I got a donation of the Sports Illustrated Swimsuit Issue! Once you have have a good collection of magazines, some cardstock paper, glue, and scissors (optional), you are ready to begin making collages.

With all of the materials available to students, I let them peruse the magazines to look for images that reflect their personalities and preferences. They find images of things they like to do, their favorite foods, pop culture of interest to them, places they have been or dream of traveling to, and other favorite things.


Students may rip or cut images, and I suggest to them that ripping the paper creates a nice transition between two images in a collage. Students sometimes choose to add words and phrases that they like. They “sign” their collages by spelling their names using letters found in the magazine text. 


Once the collages are done, give them time to dry before putting them in a pile so that they don’t stick together. I have done this activity right before a prep period so that collages can be left on student desks, or I dedicate a separate space for them to dry. Be aware that some students will finish relatively quickly, while others will want more time. I have early finishers assist peers in finding images they are looking for. (I also frequently make announcements to the class when a student is looking for a particular image so that everyone can help look for it.) For those who need more time, I provide the materials during a study hall or student free time.


Displaying student collages is a nice way to decorate the classroom and make students feel more at home in the space. The collages spark conversations between students about the images and words they chose, encouraging them to learn more about one another. There are many possible ways to display the collages, and after trying several different methods, I settled on hanging them from a wire placed high on the classroom wall and keeping them on display for the entire school year. I was lucky to have help with this from my husband Parthiv and art teacher Andrew, who both graciously assisted with installing the wires along with hooks to support the wires. Once this was done, I hung the collages using clothespins.


It was fun putting my students' collages on display, knowing that they would enjoy seeing their work when they entered the room. Thanks to the simple artwork my students created, my classroom always had a bit of decoration with a personal touch. 


Thanks for reading my blog! If you are interested in joining my email list, please follow this link:


                                SUBSCRIBE TO EMAIL LIST